When it comes to garage door safety and smooth operation, the sensors play a crucial role. If you own a Chamberlain garage door opener, you may have encountered or heard about the technique known as sensor wire push in with screwdriver Chamberlain garage door opener. This method is essential for properly connecting or troubleshooting the safety sensor wires to the opener unit.
In this comprehensive article, we’ll walk you through everything you need to know about handling the sensor wire push-in connection using a screwdriver for Chamberlain garage door openers. From understanding why this connection method is used to step-by-step instructions on how to do it correctly, plus troubleshooting tips, you’ll gain confidence to manage your garage door’s sensor wiring effectively.
Why Is Sensor Wiring Important on a Chamberlain Garage Door Opener?
Safety sensors are installed at the base of your garage door tracks to prevent the door from closing on people, pets, or objects. They work by sending an infrared beam between each other; if this beam is broken, the door will stop closing or reverse automatically.
The sensor wiring connects these sensors to the garage door opener. Proper wiring ensures the sensors function accurately and safely. Faulty wiring, loose connections, or damage can cause the sensors to malfunction, which can lead to safety hazards or prevent your door from operating correctly.
The sensor wire push in with screwdriver Chamberlain garage door opener method provides a reliable and secure electrical connection by pushing the wire into a slot that’s held in place by a spring-loaded clamp, which is tightened or released by a small screwdriver.
Understanding the Sensor Wire Push-In Connection on Chamberlain Openers
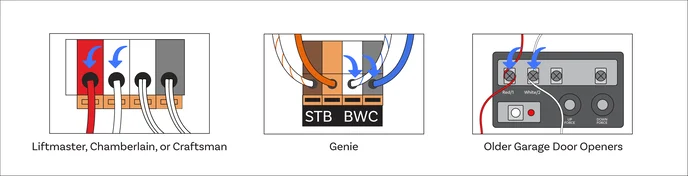
Chamberlain garage door openers use a specific wiring system for connecting safety sensors. Instead of traditional screw terminals that require loosening screws, Chamberlain models often utilize push-in terminals secured by a spring clamp inside the terminal block.
These terminals allow you to:
- Easily insert sensor wires by pushing them into the terminal slots
- Secure wires firmly by tightening the clamp using a screwdriver
- Quickly release the wires by loosening the clamp with the screwdriver when needed
This design speeds up installation and ensures a strong electrical connection, minimizing the risk of sensor failure due to loose wiring.
Sensor Wire Push In With Screwdriver Chamberlain Garage Door Opener – Step-by-Step Installation Guide
Step 1: Safety First – Power Off the Opener
Before working on any wiring, always unplug your garage door opener or switch off the circuit breaker. This prevents electric shock and accidental door movement.
Step 2: Locate the Sensor Wire Terminals
Open the motor housing cover of your Chamberlain garage door opener to access the terminal block where the sensor wires connect. This block is usually near the back or side of the unit.
Step 3: Prepare Your Sensor Wires
Make sure the sensor wires are stripped properly—about ½ inch of bare wire exposed. Be careful not to nick or damage the wire strands.
Step 4: Insert the Wires into the Terminal Slots
Using your fingers or a small flathead screwdriver, gently push the stripped ends of the sensor wires into the push-in slots on the terminal block. The terminal has spring clamps that will hold the wire in place.
Step 5: Secure the Wires with a Screwdriver
If your Chamberlain model has screws near the push-in terminals, tighten these screws with a screwdriver to clamp the wire securely. This step ensures the wires do not come loose over time.
Step 6: Double Check the Connection
Give the wires a gentle tug to make sure they are firmly secured and will not disconnect. A loose connection can cause sensor malfunctions.
Step 7: Close the Motor Housing and Restore Power
Once the wiring is secure, replace the motor cover and plug the opener back in or turn on the circuit breaker.
Step 8: Test Your Safety Sensors
Close the garage door and break the sensor beam by walking or placing an object in front of the sensors. The door should reverse or stop closing immediately, confirming proper sensor function.
Troubleshooting Sensor Wire Issues with Push-In Terminals
Even with the secure push-in method, sensor wire problems can occur. Here are some common issues and how to fix them:
- Door won’t close, and sensors are blinking: Check that the wires are firmly pushed in and clamps are tight using your screwdriver.
- Intermittent sensor failure: Inspect wires for damage, frays, or corrosion. Replace if necessary.
- No power to sensors: Use a multimeter to verify voltage at the terminal block. If no voltage is present, check circuit breakers or opener logic board.
- Sensors misaligned: Ensure both sensors face each other properly; even a slight misalignment can cause beam interruption.
Why Use a Screwdriver With Push-In Sensor Wires?
The screwdriver’s role in this setup is twofold:
- Securing the wire: Tightening screws on the terminal block ensures the spring clamp holds the wire firmly, preventing accidental disconnections.
- Releasing the wire: When you need to replace or repair the sensor wire, the screwdriver loosens the clamp to allow easy removal without damage.
Without a screwdriver, it would be difficult to make adjustments or ensure the connection’s reliability over time.
Best Practices When Handling Chamberlain Sensor Wires
- Use a proper wire stripper for clean and undamaged wire ends.
- Avoid over-tightening screws; this can damage wires or the terminal block.
- Label your sensor wires if you disconnect them to avoid confusion during reinstallation.
- Periodically inspect your wiring connections during routine garage door maintenance.
When to Call a Professional
If after properly pushing in and securing the sensor wires with a screwdriver you still experience sensor or door operation issues, consider professional help. Complex problems with wiring or the garage door opener’s logic board may require expert diagnosis.
Conclusion
Understanding how to manage sensor wire push in with screwdriver Chamberlain garage door opener connections is key to maintaining safe and reliable garage door operation. This method allows homeowners and technicians alike to install, adjust, and troubleshoot sensor wires efficiently and securely.
By following the step-by-step guide, observing safety precautions, and performing regular inspections, you can ensure your Chamberlain garage door opener sensors function perfectly, protecting your family and property.
Remember, proper sensor wiring not only improves safety but also extends the lifespan of your garage door system.
Leave a Reply